


This section outlines how to send print files from Microsoft Windows to SDI LPD. Additional information about LPR on Windows can be found in the Microsoft Windows Help file.
Windows, 7, 8.10 and 11 - The LPR Port Monitor component must be installed or the LPR command is not available.
Send a Text File to SDI LPD
Use the following steps to send a text file (*.txt) from Windows to SDI LPD. After the connection is working, you may want to set up an LPR port that automatically routes prints jobs to SDI LPD. Those steps are described in the next section of this topic.
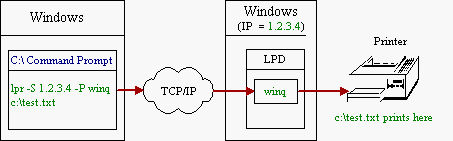
| 1. | Create a print queue in LPD. This example uses a print queue name of winq. |
| 2. | Use notepad to create a text file (c:\test.txt) with a few lines of text in it. |
| 3. | Open a Windows command prompt and enter the following command. |
lpr -S 127.0.0.1 -P winq c:\test.txt
Where:
| lpr | is the Microsoft Windows command |
| -S 127.0.0.1 | 127.0.01. is the host name or IP address.. This example uses 127.0.0.1, a loopback IP address which sends the data to SDI LPD on the same PC where the command was issued. Replace 127.0.0.1 with another server name or IP address to send the print to another location. |
| -P winq | winq is the printer queue name defined in SDI LPD. |
| c:\test.txt | c:\test.txt is the name of the file to send to SDI LPD for printing. |
| 4. | If you are unable to print, use the Windows ping command to verify the connection with the computer running SDI LPD. For example: PING 127.0.0.1 |
Create a Windows LPR Port for LPD Printing (Windows 7, 8, 10 and 11)
This section outlines how to create an LPR printer port on Windows 7, 8, 10 or 11. All print files spooled to this port are routed via TCP/IP to SDI LPD on another Windows PC.
| 1. | Create a SDI LPD printer queue. See Create a print queue in LPD for more information. The print queue you create must specify the "Send raw data to printer" option. |
| 2. | Start the "Add Printer Wizard". (Start, Control Panel, Hardware and Sound, Printers Add a Printer) |
| 3. | In the Choose a local or network printer dialog, select "Add a local printer". |
| 4. | In the Choose a printer port dialog, select the "Create a new port" radio button and in the "Type of port" edit box choose LPR Port. Click the Next button.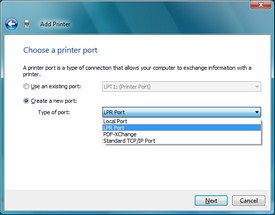 |
| 5. | In the "Add LPR compatible printer" dialog box, fill in the host name or IP address of the computer running SDI LPD and the name of the SDI LPD printer queue. Click the OK button. |
| 6. | In the Install the printer driver dialog, select the printer driver for the printer assigned to the SDI LPD printer queue. Click Next >. |
| 7. | In the Typed a printer name dialog, select a name for the LPR printer. (To avoid confusing the LPR printer with a standard printer, specify LPR or LPD in the printer name.) Click Next >. |
| 8. | In the You've successfully added printer_name dialog, Click the Print a test page button. If everything is working correctly, a test page should be printed. Click the Finish button. |
| 9. | You may now print jobs to SDI LPD by selecting the newly created printer port from any Windows program. |
Create a Windows LPR Port for LPD Printing (Windows 2000 and XP)
This section outlines how to create an LPR printer port on Windows 2000 0r XP. All print files spooled to this port are routed via TCP/IP to SDI LPD on another Windows PC.
This facility is available in Windows 2000 and Windows XP. "Print Services for Unix" must be installed or LPR ports are not available. See the step-by-step instructions for creating an LPR port below. For more information, review the Windows online help file.
(Windows 2000: Start, Help, Index, LPR, ports)
(Windows XP: Start, Help and Support, Search for LPR)
| 1. | Create a SDI LPD printer queue. See Create a print queue in LPD for more information. The print queue you create must specify the "Send raw data to printer" option. |
| 2. | Start the "Add Printer Wizard". |
Windows XP: |
Start, Control Panel, Printers and Faxes, Add a Printer |
Windows 2000: |
Start, Settings, Printers, Add Printer |
| 3. | In the Add Printer Wizard dialog "Welcome..." screen, Click Next >. |
| 4. | In the Add Printer Wizard dialog "Local or Network Printer" screen, select the following radio button and Click Next >. |
Windows XP: |
"Local printer attached to this computer" |
Windows 2000: |
"Local printer" |
| 5. | In the Add Printer Wizard dialog "Select a Printer Port" screen, select the "Create New Port" radio button. Select "LPR port" from the "Type of port" drop-down list box. Click Next >. Note: If the "LPR port" selection is not available, "Print Services for Unix" must be installed. |
Windows XP: |
Start, Control Panel, Add/Remove Programs, Add/Remove Windows Components, Other Network File and Print Services. |
Windows 2000: |
Start, Settings, Control Panel, Add/Remove Programs, Add/Remove Windows Components, Other Network File and Print Services. |
| 6. | In the "Add LPR compatible printer" dialog box, fill in the host name or IP address of the computer running SDI LPD and the name of the SDI LPD printer queue. Click the OK button. |
| 7. | In the Add Printer Wizard dialog "Install Printer Software" screen, select the printer driver for the printer assigned to the SDI LPD printer queue. Click Next >. |
| 8. | In the Add Printer Wizard dialog "Name Your Printer" screen, select a name for the LPR printer. (To avoid confusing the LPR printer with a standard printer, specify LPR or LPD in the printer name.) Click Next >. |
| 9. | In the Add Printer Wizard dialog "Printer sharing" screen, select the "Do not share this printer" radio button. Click Next >. |
| 10. | In the Add Printer Wizard dialog "Print Test Page" screen, select the "Yes" radio button. Click Next >. If everything is working correctly, a test page should be printed. |
| 11. | In the Add Printer Wizard dialog "Completing the Add Printer Wizard" screen, click the Finish button. |
| 12. | You may now print jobs to SDI LPD by selecting the newly created printer port from any Windows program. |