There are two ways to use multiple sessions in TN3270 Plus
| • | Multiple sessions in a single window |
| • | Multiple sessions in multiple windows |
Creating Your Sessions
For either method of running multiple sessions, the first step is to create your sessions. Assume we need the following sessions:
Session Name |
Host Name |
Telnet port |
Terminal Type |
Mainframe |
tnserver.di3270.com |
23 |
3270 |
AS400 |
as400.com |
23 |
5250 |
UNIX |
140.147.254.3 |
23 |
VT220 |
To create the sessions:
| 1. | Open the Connect to Host dialog box (Host, Connect…). |
| 2. | Type in the settings for the first session (for example, Mainframe) |
| 3. | When the first session settings are complete, type in the session name for the next session (for example, AS400) and press the tab key. You will be prompted to save changes to the Mainframe session. Respond yes. Complete the settings for the AS400 session and press the tab key. You will be prompted to save changes to the AS400 session. Respond yes. Continue in the same manner until all your sessions are created. |
Using Multiple Sessions in a Single Window
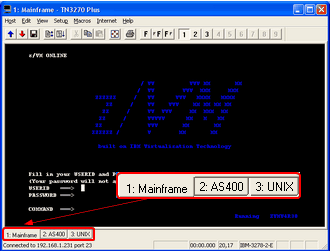
TN3270 Plus allows you to connect up to 99 different display and/or printer sessions concurrently in a single window. The display and/or printer sessions may be of different terminal types and may be connected to one or more host computers. Each session is given a session number between 1 and 99.

To connect the Mainframe, AS400 and UNIX sessions.
| 1. | Open the Connect to Host dialog box (Host, Connect…). |
| 2. | Select Mainframe in the Session name list box. |
| 3. | Click the Connect… button. |
| 4. | To connect the AS400 session as your second session, open the Connect to Host dialog box (Host, Connect…). |
| 5. | Select AS400 in the Session name list box. |
| 6. | Click the Connect… button. |
| 7. | Repeat the same steps to start the UNIX session. |
Although multiple sessions may be active, only the current session is displayed in the TN3270 Plus window. To switch to another session, do one of the following:
|
Select a new session tab. Session tabs appear after more than one session is connected. You can turn off session tabs (Setup, Preferences..., Don't show session tabs (requires restart). |
|
Select a new session button from the toolbar. Active session buttons are bold. Unused sessions are grayed out. |
|
Select a new session from the session list in the Host menu. The current session is marked with a check mark. |
HostSession + n |
Press the HostSession + n key (default Alt +n), where n is the session number. |
ViewNextSesson |
Press the ViewNextSession key (default Ctrl + Tab) to cycle through the sessions. |
ViewPreviousSession |
Press the ViewPreviousSession key (default Shift + Ctrl + Tab) to cycle backwards through the sessions. |
Tips:
| · | If your want one or more sessions connected each time TN3270 Plus is started, specify the "Connect at Startup" option for the session(s). (Host, Connect…, Advanced button, Setup Items = Host, Connect at Startup), |
| · | If you want a session started using the same session number every time you connect, you can specify a Preferred Session Number in the Session Setup dialog box. (Host, Connect, Advanced button, Setup Items = Host, Preferred Session Number) If the preferred session number is already in use, your session starts using the first available session number. |
| · | By default TN3270 Plus allows 99 sessions in a single window, you can limit the number of sessions by adding the following DWORD registry entry: |
HKEY_CURRENT_USER\Software\SDI\TN3270 Plus\Configuration\MaximumSessions
and setting it to the maximum number of sessions you wish to allow. See Limiting the Number of TN3270 Plus Sessions for more details.
Using Multiple Sessions in Multiple Windows
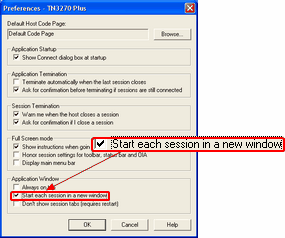
If you want to have multiple sessions in multiple Windows, specify the "Start each session in a new window" preference (Setup, Preferences…, Start each session in a new window).

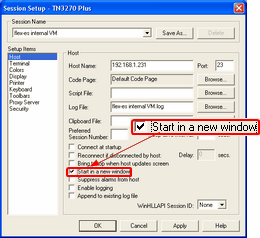
If you only want some sessions to run in a separate window, you can use the "Start in a new window" session option (Setup, Sessions…, Setup Items = Host, Start in a new window).

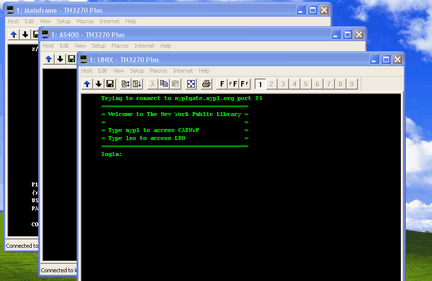
For example, our sample sessions would like something like the following screen shot when run in multiple Windows instead of a single window.

If you want to create shortcut on your desktop to start TN3270 Plus and connect a particular session, do the following.
| 1. | Create a TN3270 Plus shortcut on your desktop by right-clicking and dragging the TN3270 Plus icon to your desktop and dropping it. |
| 2. | Select "Create Shortcut(s) Here" from the pop-up menu. |
| 3. | Right-click the newly created desktop icon and select rename. Rename the icon as desired. (For example, TN3270 Plus Mainframe Session.) |
| 4. | Right-click the icon again and select Properties. In the Target edit box, add the session name after the path. For example, to add the Mainframe session: |
"C:\Program Files\SDI\TN3270 Plus\tn3270.exe" /Session "Mainframe"
Double-clicking on this icon starts TN3270 Plus and connects the Mainframe session. For more information on specifying options for a shortcut icon, see Specifying Parameters on the Command Line.
Tips:
| • | By default TN3270 Plus does not limit the number of times it can be started. You can limit the number of times TN3270 Plus can be started (instances) by adding the following DWORD registry entry: |
HKEY_CURRENT_USER\Software\SDI\TN3270 Plus\Configuration\MaxInstances
and setting it to the maximum number of instances you wish to allow. When the maximum number of instances is reached an attempt to start another instance results in the most recently started instance being brought to the foreground. See Limiting the Number of TN3270 Plus Instances for more details.
TN3270 Plus is continually being improved. To learn more about the latest enhancements, please review our Version History web page.


